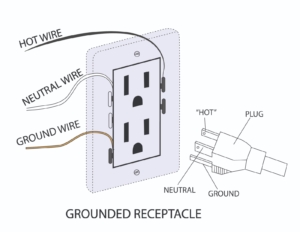
Before delving into what constitutes an incorrectly wired outlet, we need to understand the components of the electrical outlet and its functions. An outlet commonly available in houses provides a pathway through which electrical devices receive an electrical supply to operate. And any electrical outlet will contain a neutral wire and a hot wire.
Further, the presence of the grounding wire depends on the type of electrical outlet. Grounded outlets contain ground wire, while ungrounded types don’t have this third conductor. Each of these three wires serves a different function. The hot wire brings electricity from the current source (your home’s electrical panel) and transfers current to the device connected to the outlet.
The neutral wire provides a pathway for the return of the electricity to the source. And thus, this wire aids in completing the circuit.
The ground wire, present only in grounded outlets, transfers excess current to the ground and helps in absorbing overload. Thus the ground wire helps in preventing electrical overheating and fires. Moreover, if you have ungrounded or two-prong outlets, you should consider updating your system to grounded conductors or outlets that provide ground fault protection.
Now, speaking of improperly wired electrical outlets, we need to focus on the connection between the wiring components of the outlets. Each of these wires have their designated connection terminals within the outlet itself, setting the required polarity. Faulty connections and incorrectly placed wires will result in a miswired electrical outlet. Here we will discuss a few common scenarios:
Loose wiring:
Loose connections can give electrical supply but carry the potential for fire and shock hazards. A loose connection can result in electrical arcing and overheating of the outlet. Notably, this can happen in both two-prong and three-prong outlets.
Open faults in the neutral and hot segments:
When the neutral or hot wire is not connected to the terminal within the outlet, you get an “open neutral” or “open hot” fault, respectively. With an “open hot” issue, your connected device will not function.
Most notably, if the hot wire gets an electrical current but has no connection with the given path in the outlet, the current cannot flow through the connection of the hot wire to the device. And the current accumulates and flows through unplanned paths, producing arc faults and fire accidents.
In the case of an “open neutral” fault, the current gets no return path to get back into the electrical source. And that causes a high current to flow through the device connected to the outlet, and the resulting surge causes the breakdown of the connected device.
Reverse connection:
Reverse faults can occur between hot and neutral wires. This miswiring involves the connection of the hot to the neutral terminal of the outlet and the neutral to the hot terminal. Hot-neutral reversed miswiring can expose you to current even when the connection is switched off.
When the hot and ground wires are reversed, the pattern is similar to hot-neutral reversed. And this reversal fails to make the connected device function.
Signs of Improper Electrical Wiring
Electrical wiring mistakes exhibit signs which are given below.
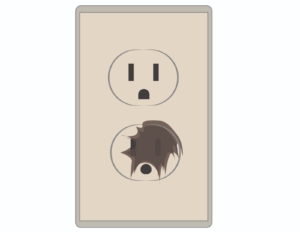
- Electrical sparks or burning smell from the outlet
- Overeating felt from the exterior of the outlet or plugged in device
- Plugs no longer fit into the outlet
- Melted or discolored plastic of the plug
- Experiencing shock from the device connected to the outlet
- Dark and sooty color of the outlet area, which gets connected to the device plug
- Sizzling sound on connecting the device to the outlet
- Connected device fails to function
What Happens If You Have A Miswired Wired Outlet?
Wrong installation of your electrical wiring system can lead to miswiring. And this comes with harmful consequences. Miswired electrical outlets carry reverse connections and thus alter the supposed path for electrical circulation. In some cases, you may encounter a spark or abrupt malfunction of connected electrical devices. But when your device requires or draws a high current to function, there is a higher chance of major electrical accidents including electrocution and house fires.
Safety Measures to Avoid Miswired Electrical Outlets
With easy yet effective ways, you can surely address miswired electrical outlets. When buying a house, you need to check the presence of faulty electrical wiring. Always seek the service of licensed and experienced home inspectors to thoroughly check the electrical system, including the electrical outlets.
Further, you should not perform electrical work as a DIY project to address faulty installations and improperly wired electrical outlets. Always consult a licensed electrician to perform electrical repairs.
Final Thoughts
Miswired electrical outlets can cause obvious damage to your home and put the lives of residents at risk. The miswiring can arise from faults in the connection of hot, neutral, and ground wires in the outlet.
Precisely, the causes of improperly wired connections include loose wiring, reverse polarity, and open faults. With a miswired outlet, your devices can be adversely affected or may not function at all.
Further, miswiring can lead to sparks and fire hazards. But with several safety measures, you can avoid faulty outlets. And you need to seek the service of experts for correcting improperly wired outlets.


")