A fireplace or wood stove is more than just a source of warmth during cold winters; it adds a touch of elegance and coziness to any home. These timeless heating options have been cherished for centuries and continue to be a popular choice among homeowners. In this article, we will explore the benefits, types, maintenance tips, and environmental impact of fireplaces and wood stoves.
Types of Fireplaces:
Fireplaces come in various types, each with its own characteristics and installation requirements. Traditional masonry fireplaces offer a classic, authentic feel and are often constructed on-site with bricks or stones. While they provide a timeless look, they can be costly to install and may require structural modifications. Prefabricated fireplaces, also known as factory-built fireplaces, are easier to install as they come pre-made and can be customized to suit your preferences. Electric fireplaces provide a convenient option that requires no venting, making them ideal for apartments or homes without chimneys.
Wood Stove Options:
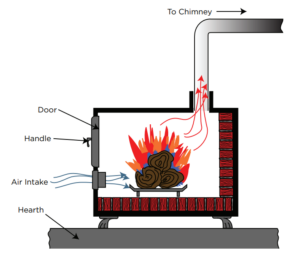
Wood stoves are highly efficient heating appliances that burn wood logs or pellets. They come in different styles, such as cast iron, steel, or soapstone, each with its own unique benefits. Cast iron stoves are known for their durability and excellent heat retention properties. Steel stoves are lightweight and heat up quickly, making them ideal for smaller spaces. Soapstone stoves offer even heat distribution and retain heat long after the fire has gone out. Consider factors such as heating capacity, design, and maintenance requirements when selecting a wood stove that suits your needs.
Maintenance Tips:
To ensure the safety and longevity of your fireplace or wood stove, regular maintenance is essential. Clean the chimney or flue regularly to remove soot and creosote buildup, which can pose fire hazards. Inspect the chimney cap for any damage or blockage that may affect proper airflow. For wood stoves, clean the ash regularly to maintain optimal combustion efficiency. It is also crucial to have the stovepipe and gaskets inspected annually to identify and address any potential issues. Always follow the manufacturer’s guidelines for maintenance and consult professionals for complex tasks.
Safety Precautions:
Fireplaces and wood stoves require caution and adherence to safety guidelines to prevent accidents and ensure the well-being of your household. Install carbon monoxide detectors and smoke alarms near the heating appliances to provide early warnings in case of malfunctions or fire hazards. Use a sturdy fireplace screen to prevent sparks from escaping and causing potential fires. Keep flammable materials such as curtains, rugs, and furniture at a safe distance from the hearth. Never leave fires unattended and ensure that family members, especially children, are educated about fire safety.
Common Issues:
While fireplaces and wood stoves are reliable heating options, they can encounter certain issues that require attention and maintenance. Here are some common problems associated with fireplaces and wood stoves:
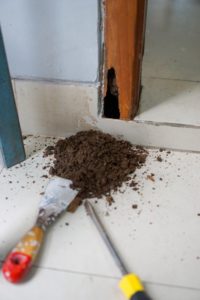
- Chimney Creosote Buildup: Creosote is a byproduct of burning wood that can accumulate inside the chimney over time. If not regularly cleaned, creosote buildup can restrict airflow, decrease efficiency, and pose a fire hazard.
- Chimney Blockages: Debris, animal nests, or fallen branches can obstruct the chimney, preventing proper ventilation and causing smoke to back up into the house. Regular inspections and cleaning can help identify and resolve such blockages.
- Damaged Chimney Caps or Dampers: Chimney caps and dampers play a crucial role in keeping out rain, birds, and debris. If damaged or malfunctioning, they can allow moisture to enter the chimney, leading to deterioration and increased risk of chimney fires.
- Cracked or Damaged Firebox: Over time, the intense heat from fires can cause cracks or damage to the firebox, which can compromise the structural integrity and efficiency of the fireplace or wood stove. Repairs or replacement may be necessary to ensure safe operation.
- Inadequate Draft: Poor drafting can result in smoky fires, inefficient burning, and difficulty in starting or maintaining a fire. Draft issues can stem from chimney height, obstructions, or incorrect flue sizing. Proper ventilation adjustments or professional assistance may be required.
- Malfunctioning or Clogged Catalytic Converters: Some wood stoves are equipped with catalytic converters that help reduce emissions and improve efficiency. However, these converters can become clogged or worn over time, leading to decreased performance. Regular maintenance and cleaning are necessary to keep them functioning optimally.
- Damaged or Worn Gaskets: Gaskets are used to create an airtight seal between the various components of a wood stove, such as the door or the stovepipe. If gaskets become damaged or worn, it can result in air leaks, reduced efficiency, and difficulty in controlling the fire. Replacing gaskets is a common maintenance task.
- Improper Ash Management: Failure to remove ashes regularly can hinder proper airflow and combustion efficiency. Excessive ash buildup can also increase the risk of accidental fires. Proper ash management, including regular removal and disposal, is crucial for optimal stove performance and safety.
- Insufficient Combustion Air Supply: Wood stoves require a sufficient air supply for proper combustion. Inadequate air intake can lead to inefficient burning, increased smoke, and decreased heat output. Ensuring proper air circulation and venting is essential for optimal stove performance.
- Improper Installation or Venting: Incorrect installation or venting of fireplaces or wood stoves can result in a range of problems, including smoke leakage, poor performance, and safety hazards. It is important to follow manufacturer guidelines and, if unsure, consult a professional for proper installation and venting requirements.
Regular maintenance, professional inspections, and prompt resolution of any issues can help ensure the safe and efficient operation of fireplaces and wood stoves.
Hiring Professional Services:
For the installation, maintenance, and repair of fireplaces and wood stoves, it is advisable to seek professional help. Experienced technicians can ensure proper installation, chimney cleaning, and inspection, which are essential for optimal performance and safety. They have the knowledge and expertise to identify any potential issues, such as chimney blockages or carbon monoxide leaks, and provide appropriate solutions. By relying on professionals, you can have peace of mind knowing that your heating system is in capable hands.
Final Considerations:
While fireplaces and wood stoves require an initial investment, they can provide long-term cost savings. By utilizing them as supplemental heating sources, you can reduce the reliance on central heating systems and lower your energy bills. Moreover, the aesthetic appeal and added value they bring to your home can enhance its resale potential. From their warmth and visual appeal to energy efficiency and environmental considerations, these traditional heating features offer a blend of practicality and style. By understanding the various types, practicing proper maintenance, and prioritizing safety, you can enjoy the timeless charm and cozy atmosphere provided by fireplaces and wood stoves for years to come.


")